Menu. Files
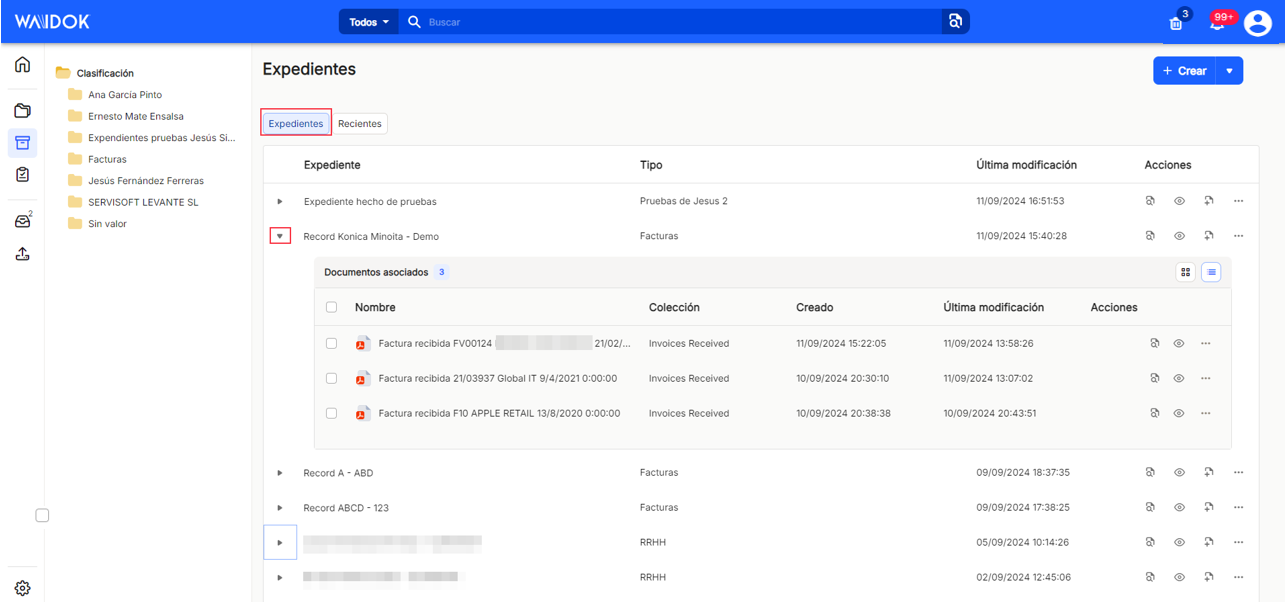
 EXPEDIENTS
Displays in a new frame, the display of the name of the existing files in each of the collections in which they may be classified, depending on the property that had been configured for each type of file, as well as the hierarchical arrangement of the same, plus the possibility of browsing through the files by the name of each collection. In this way it is possible to see the documents that are in each of the files.
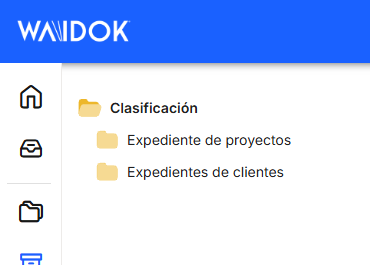
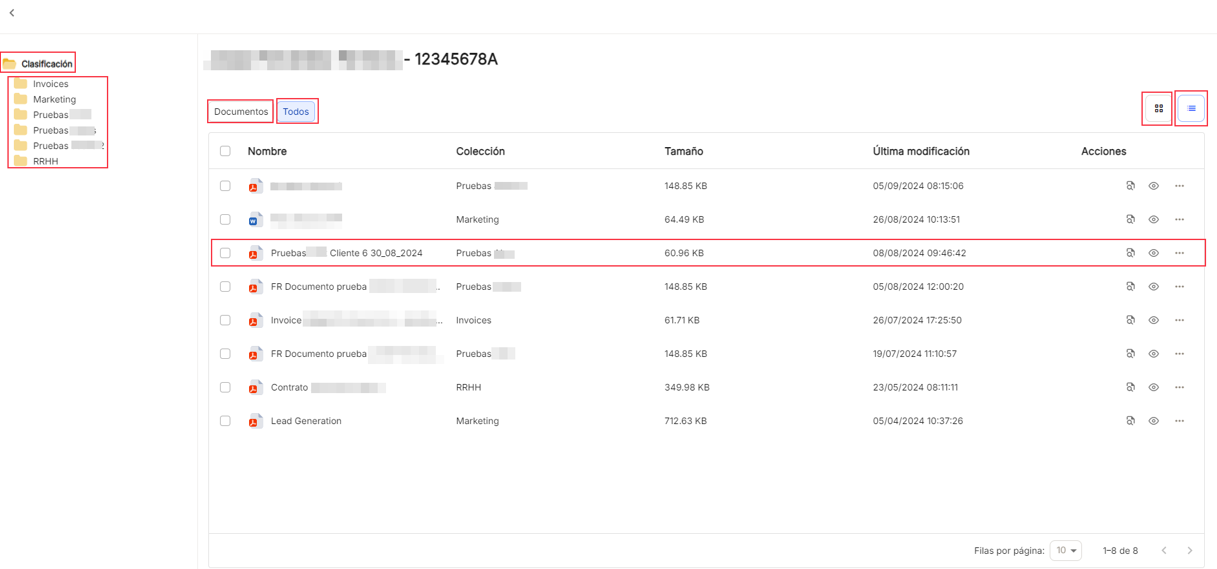
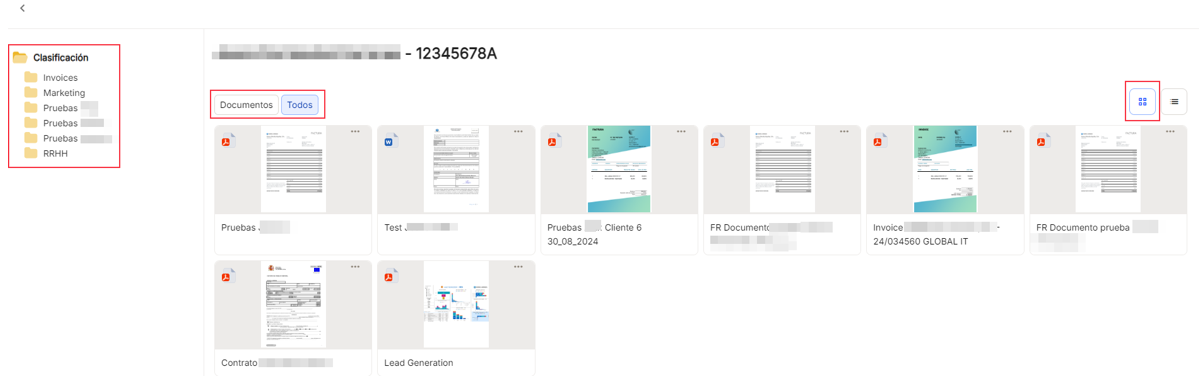
Under "Classification" the hierarchical and ordered list of all existing files is displayed, as defined, allowing you to browse through them by clicking on the name of each file, and displaying the list of documents it contains and their data.
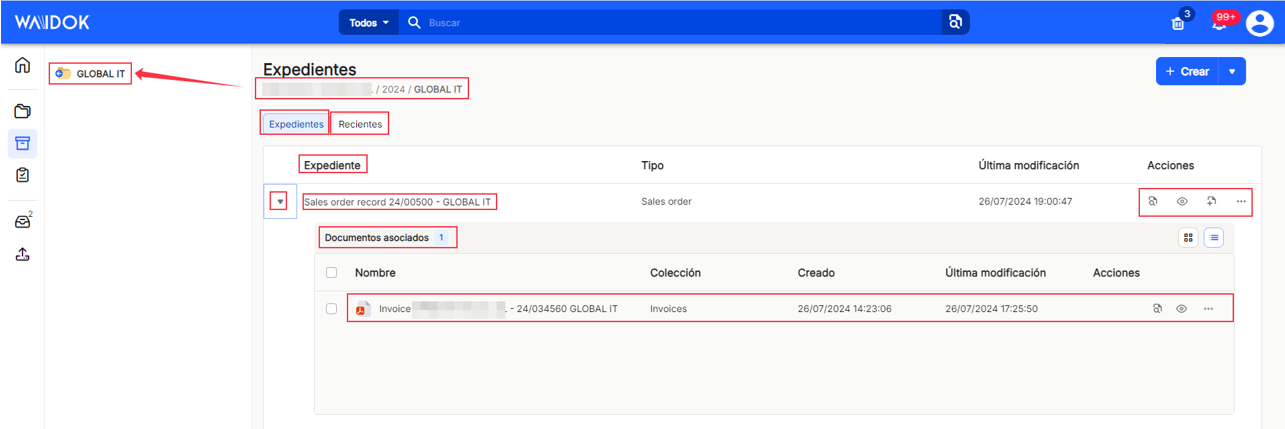
If you access any of the existing and generated collections, you can view all the files and documents dependent on each of them. From this view of the collection, you can follow the complete path of the folders, as well as perform "Actions" on files and documents, which are explained in detail below, on this same page, after the "+ Create" section.
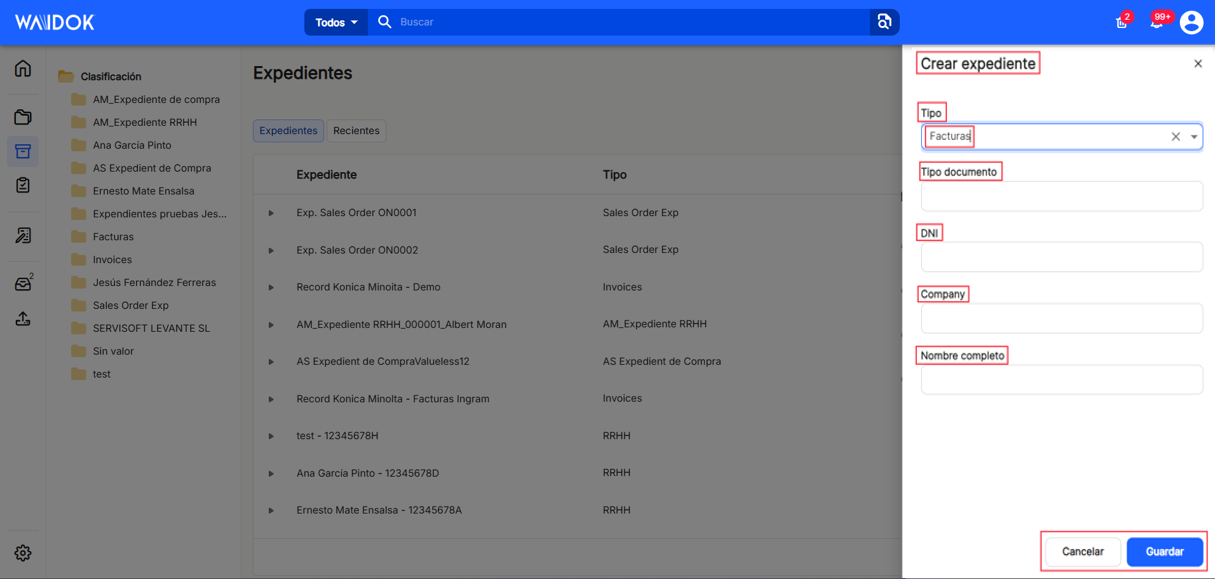
In the right part of the window, the button "+ Create"When clicked, it will offer the user the possibility, in a new pop-up window, to add files to the existing collections, ![]()
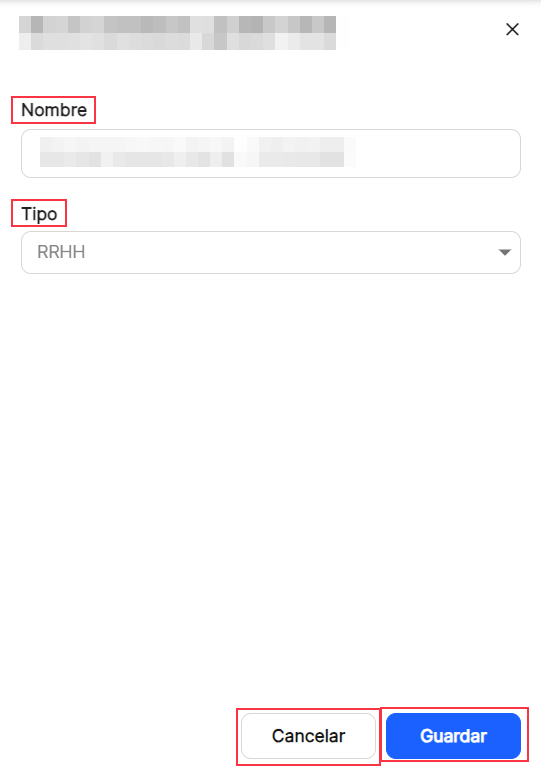
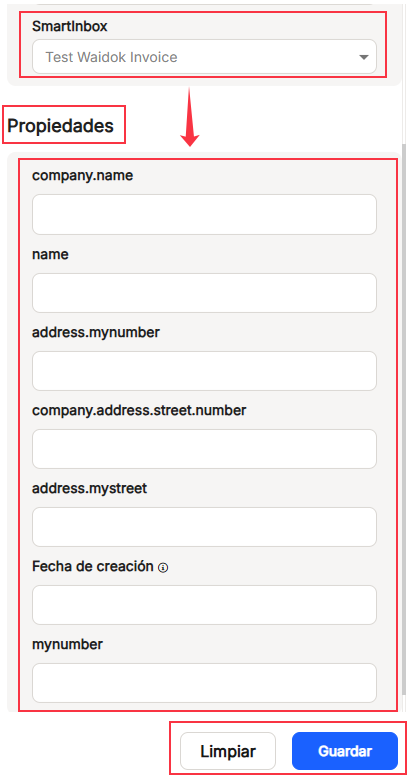
The pop-up window that is displayed in the frame, will allow to "Create file", firstly always choosing a "Type" of file, which has been previously defined in"Type of file" from"Control Panel", and through a drop-down, will allow to select and depending on the type of file, will allow the user to complete the properties that correspond to the selected type, both mandatory and voluntary. The example shows some properties for the Invoice file type and another for the HR file type.
In the main window, the total documents in each of the files can be viewed by clicking on the "Documents" button (marked by default) or by clicking on the "Recent" button to view the documents in that folder, sorted by the most recent date.
![]()
With the "grid" or "list" icons (marked by default), it allows the display of the documentation in the "documents" or "recent" sections, in the selected mode.
![]()
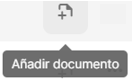
The table showing the files and their properties allows different sorting and classification possibilities, allowing the different columns to be shown or hidden. In files, you can see "File","type","last modification" and"actions". (*) In addition, the"add documents" icon will allow the user to insert new documents in the selected file, indicating the type or collection to which they wish to assign them. To do this, the application displays a new subwindow for"Associate document" where this selection can be made from a drop-down list.
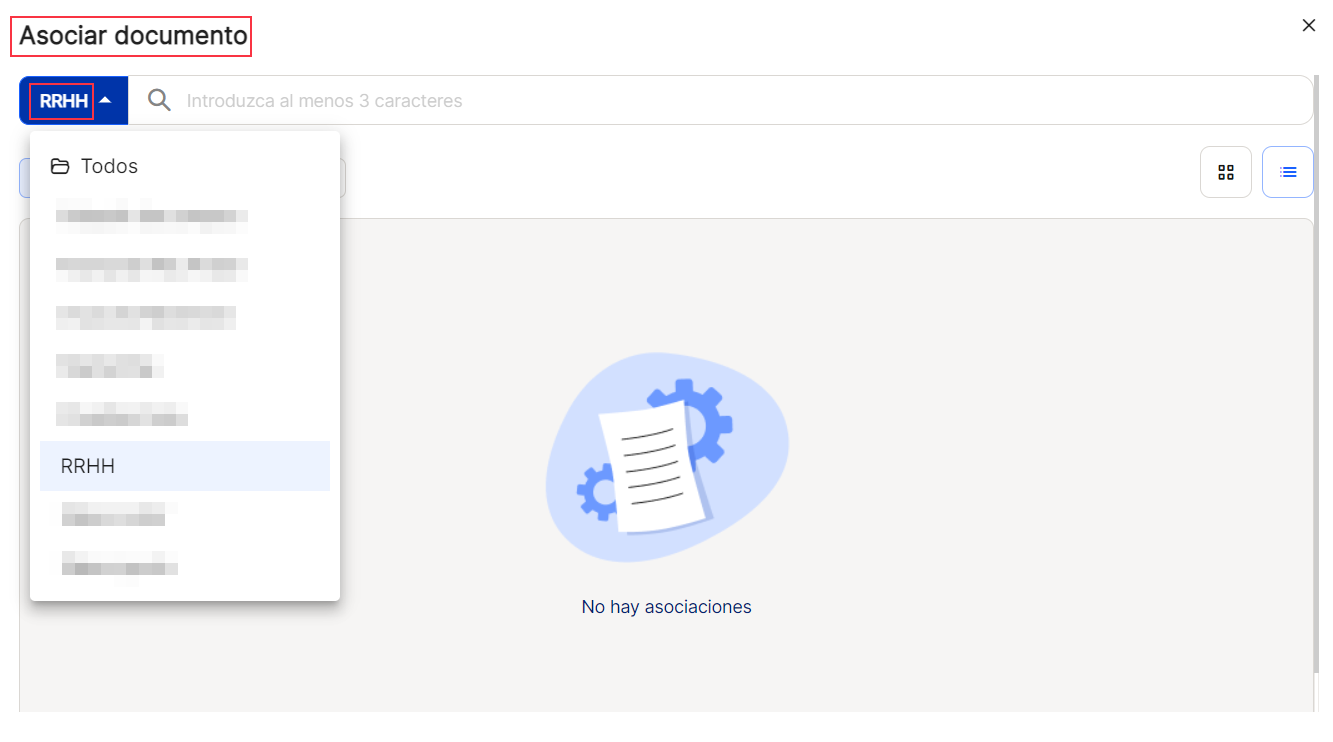
In "Associate documentIt is not only possible to make a selection of type or collection from the drop-down list, but it is also possible to perform a search on the existing ones, from at least 3 characters, and also a preset time filter, with the ranges of "-", "-", "-", "-", "-", "-", "-", "-", "-", "-", "-", "-" and "-".today", "last week" y "last month". Also as throughout the entire application the view can vary with the icons. "grid" or "listing" (checked by default), allows the display of the documentation in the following sections "documents" or "recent"in the selected mode. ![]()
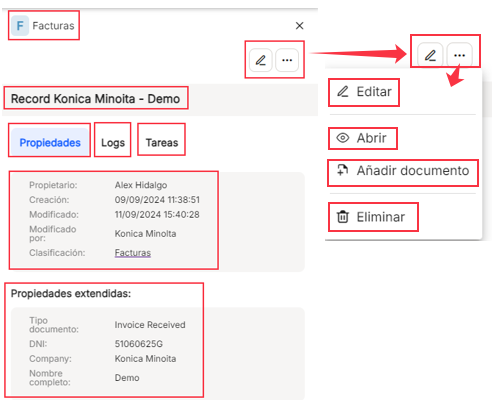
By clicking on the "..."will display a subwindow with several options to perform on the files, such as "edit", "properties", "open", "add document" and "delete".. With the adjacent icons on the left, direct actions can be performed, such as "Properties"  (where it shows the file properties) "Open"
  (where it shows the documents contained in the file) and "Add document"
  (displays a floating window to select a document to add to the file, which is explained in this section).
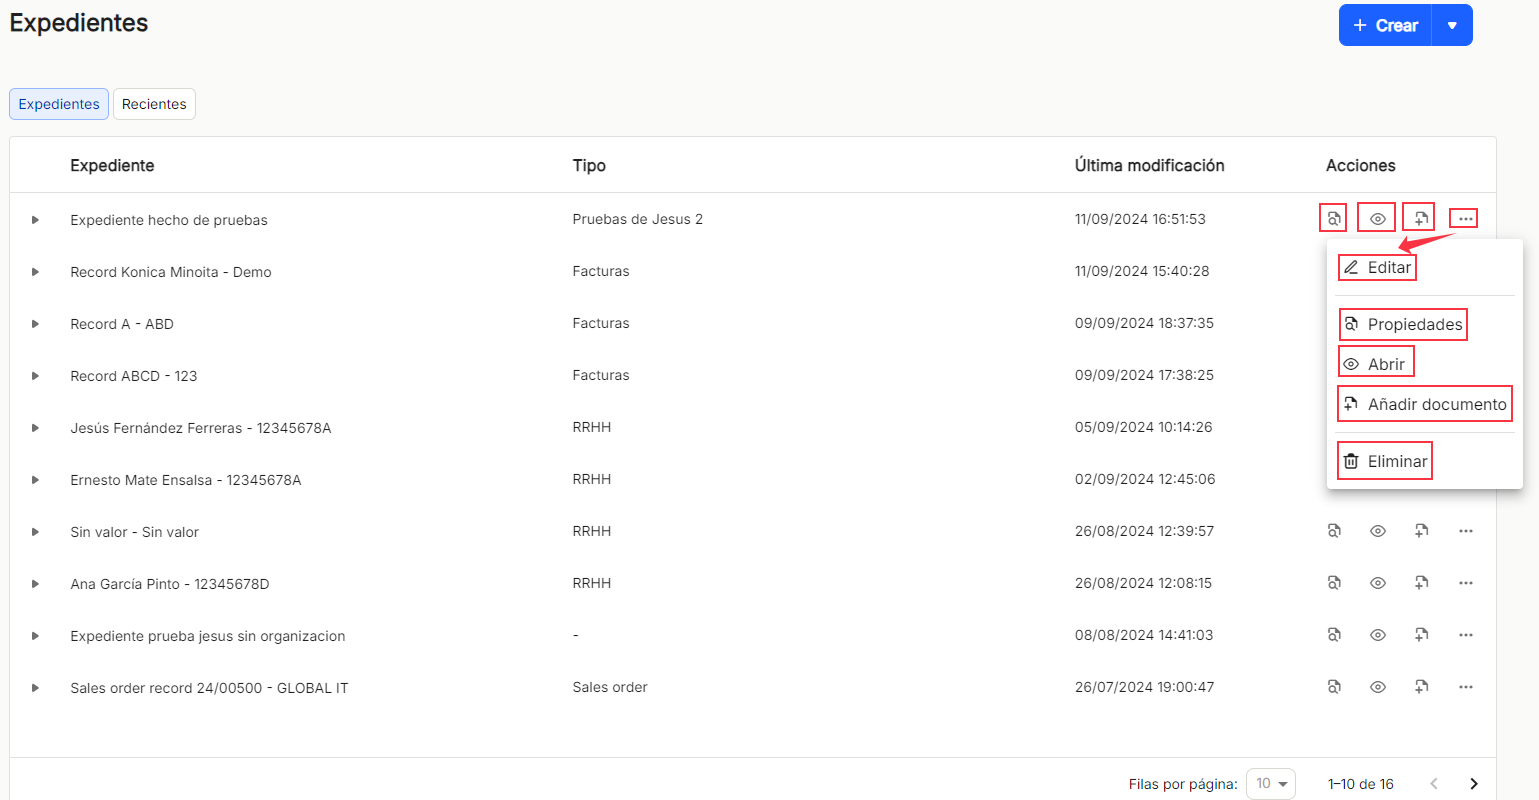
The"edit" option will allow the user to modify the file data, both the name and the type or collection. Then"save" to consolidate the changes or"cancel" if you do not wish to keep them.
The"Properties" option will allow the user to view the properties of any type of file, the logs and the tasks associated with the file. If necessary, the properties can be modified from here using the pencil icon or from the icon with the three horizontal dots, a menu will be displayed that also contains this option and others such as "open", "add document" and "delete" (actions already explained in this section). Then"save" to consolidate the changes or"cancel" if you do not wish to keep them.
With the"open" option we will be able to see in a pop-up window, all the documents that are in some of the registered files. By default, the "All" option is always activated, but if the "Documents" tab is activated, only those belonging to the selected file are shown. By default it is shown as a "list", but you can use the "grid" option. (*) All actions to be performed on documents are described in detail in the "Document Explorer" chapter.
The pop-up window obtained after opening a file to check its documentary content, allows, from the left side of the window, a file navigation with a significant folder icon, being able to go back at any time.

The"add document" (*) option offers again the options discussed above.
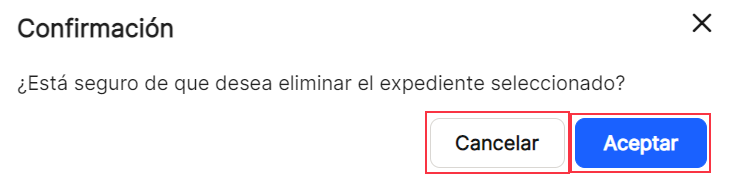
The"delete" option launches a pop-up window to confirm or cancel this decision on the file.
The "Dossiers" are displayed by default without displaying their contents. To see the documents they contain we must click on the horizontal arrow  which will switch to vertical , allowing the display of documents and their characteristics and properties. The "Recent"
The table showing the documents contained in each file and their properties, allows different sorting and classification possibilities, allowing the different columns to be shown or hidden. The"associated documents" show"Name","collection","created","last modification" and"actions".
In each document or for all documents, if the checkbox is checked, you will be able to perform a series of operations on the selected items, such as "view", "download", "delete" and "edit".
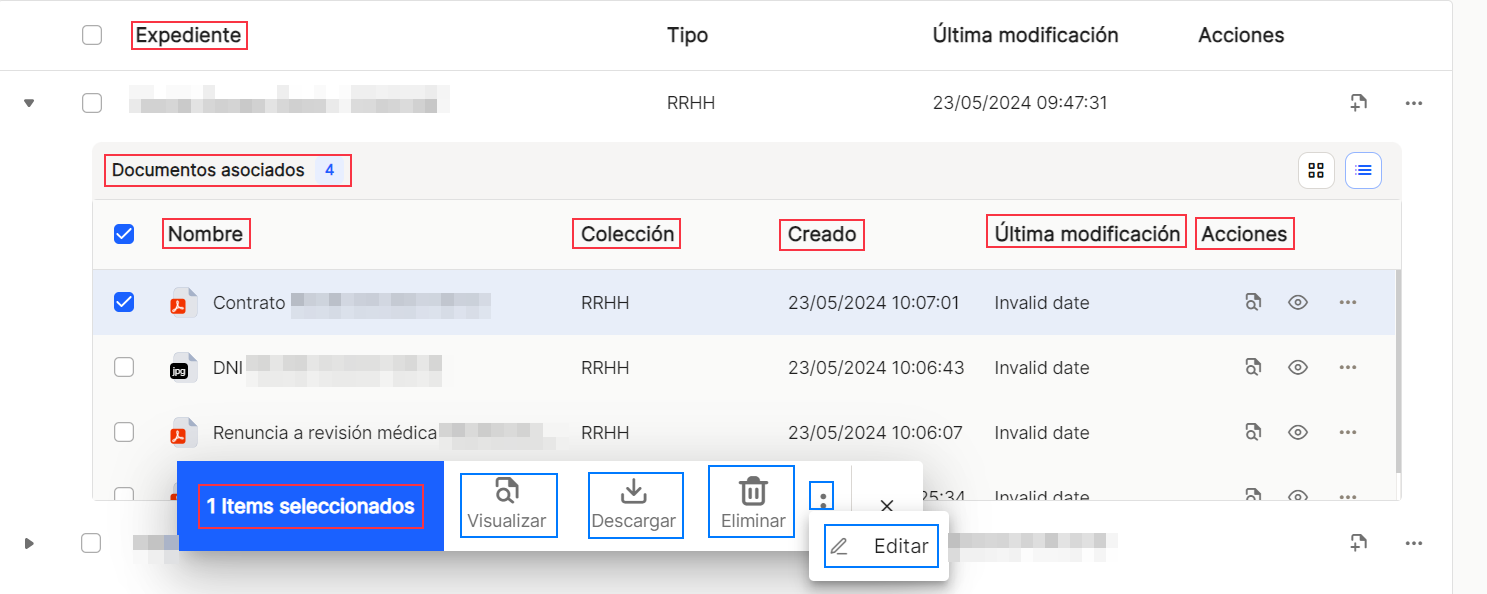
Each document will appear by default in each line, with its name, as defined in the "automatic name", "collection", "created", "last modification" and "actions" options.

In the column actions to be executed or produced on the documents already uploaded, there are the shortcuts "properties", where you can see and view the properties of each document and perform different operations with them and "open", through which you can launch the document display. These operations are repeated in the same way throughout the application.
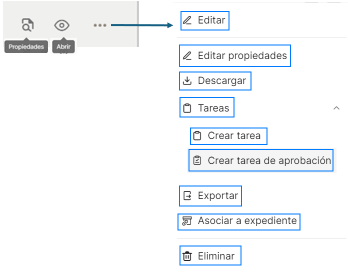
Through the icon "...", a more extensive menu will be displayed, with added functions, such as"open","properties", "edit", "download", "tasks", with the subtasks > "Create task" and "Create approval task", "export", "associate to file" and "delete". All of them are explained in the section of the Menu called "Document Explorer".
The explanation of the icons and options are explained in the"Document Explorer" section, accessible from this link.
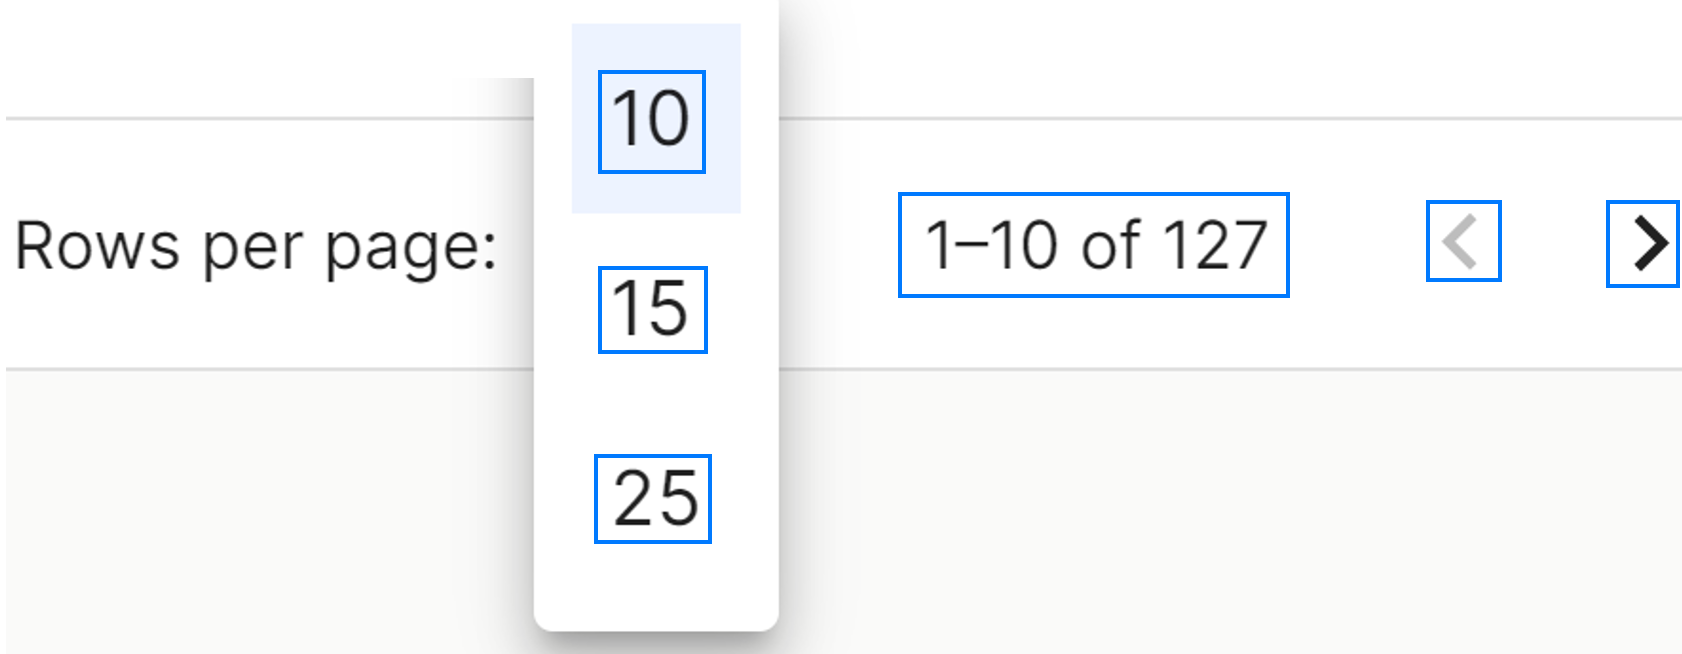
At the bottom right of the table, you can select the number of rows to be displayed, between 10, 15 and 25, and the navigation arrows to scroll through the results.
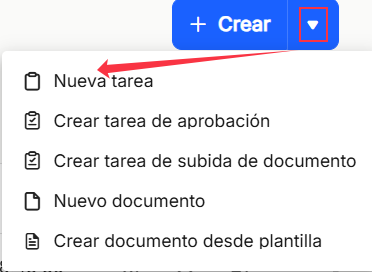
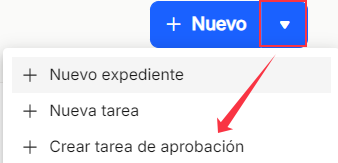
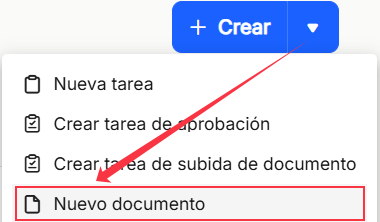
In the "+ Create" button, on the right side, the arrow that appears, when clicked, will display a new drop-down menu that will offer the options "New task" (allows to create a new task), "Create approval task" (allows to generate a new approval task), "Create document upload task" (allows to create a new task to upload a document to created collections), "New document" (allows to generate a new document) and "Create document from template".
"New task"
"New task" will allow you to create a new "General" task directly, either applied to a document by clicking "Select document" or to a file by clicking "Select file". The "Subject" of the task must also be indicated in a free text box. Likewise, a user or group can be selected from the drop-down menu in the "To" box. A "Start date" and an "End date" can also be selected for the task, and a "Status" and a"Priority" type can also be selected, with the different options offered.
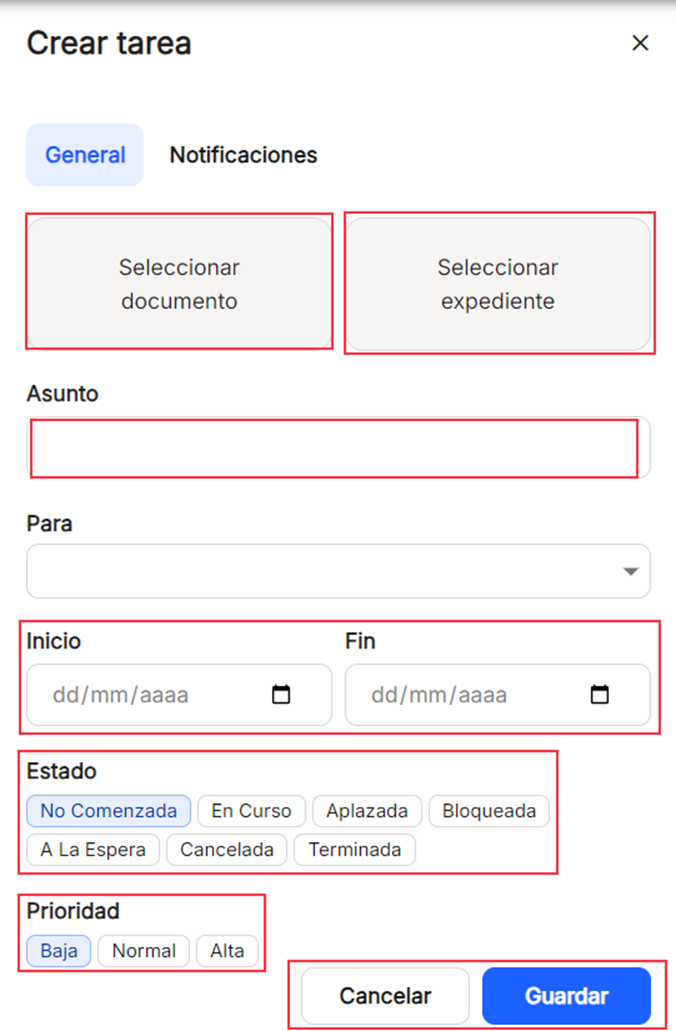
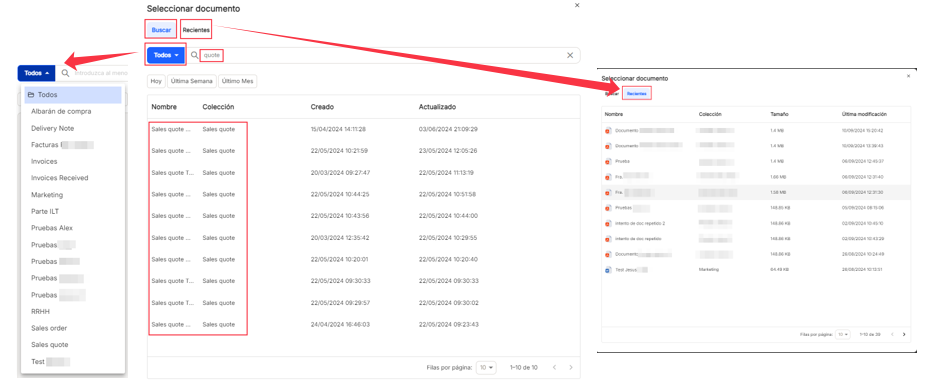
"Select document". It allows the user to select a document to be associated with the created task, either by searching through all existing collections, or by selecting as a filter, any of those shown in the "All" drop-down list that will be displayed when the arrow is pressed, together with the possibility of filtering by the time periods already established, such as "Today", "Last week" or "Last month". Just by entering three initial characters, the system will be able to search and locate documents containing them. The "Recent" tab will display a list of the latest documents that have been modified or entered in the tool so that you can select them without having to search.
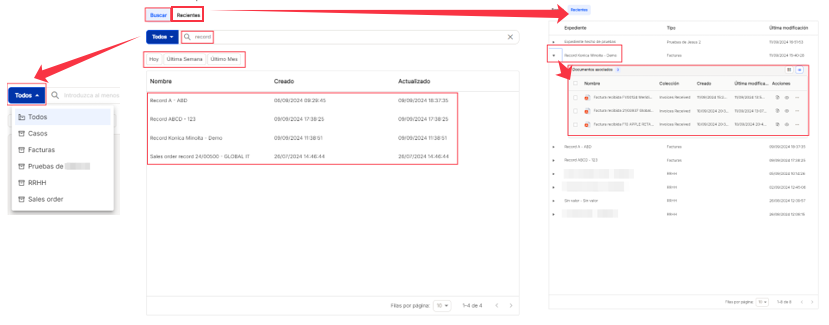
"Select file". It allows the user to select a record to be associated with the created task, either by searching through all types of registered records or by selecting as a filter one of those shown in the "All" drop-down list that will be displayed when the arrow is clicked, together with the possibility of filtering by the time periods already set, such as "Today", "Last week" or "Last month". Just by entering three initial characters, the system will be able to search and locate files containing them. The "Recent" tab will display a list of the latest files that have been modified or entered in the tool so that you can select them without having to search. The documents associated with the file can be displayed by clicking on the arrow to the left of the file name.
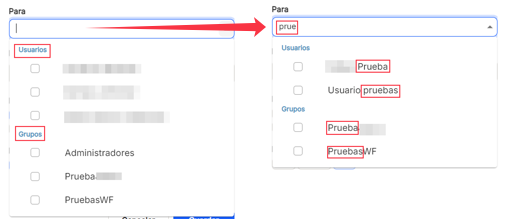
"To". You can select from the search a user or group from the existing ones, use the search, and just enter three characters, and it will locate the relevant matches. By default, it will always display the first three values of the list of both users and groups, but searches will be performed on all the lists already established.
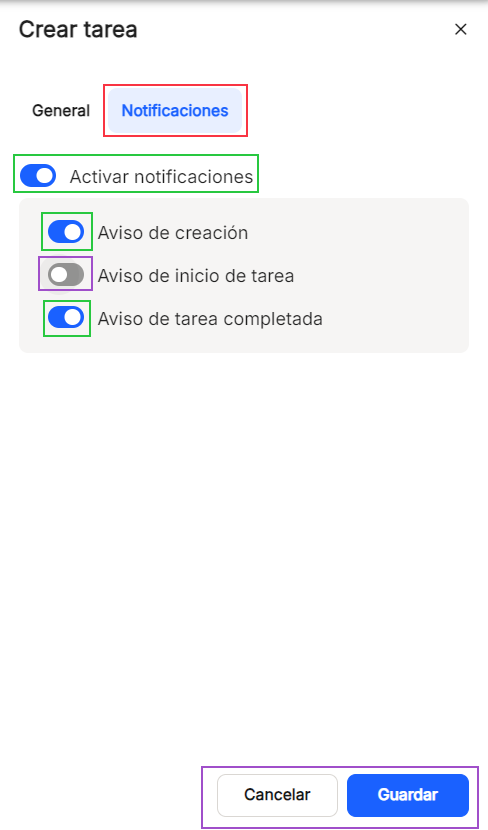
By clicking on "Create task", you will also be able to enable or disable notifications for that task. The options are "Create notification" (notifies the task recipient that a task has been assigned), "Task start notification" (sends an alert to the task recipient of the day the task will start) and "Task completed notification" (issues an alert to the task creator once the task has been completed).
"Create approval task"
"Create approval task" will allow you to directly create a new approval task, applied to a document by clicking "Select document". You can also select a user or group from the drop-down menu in the "To" box. You can also choose an "End date" for the task, and you can also select a"Priority" type, with the different options offered.
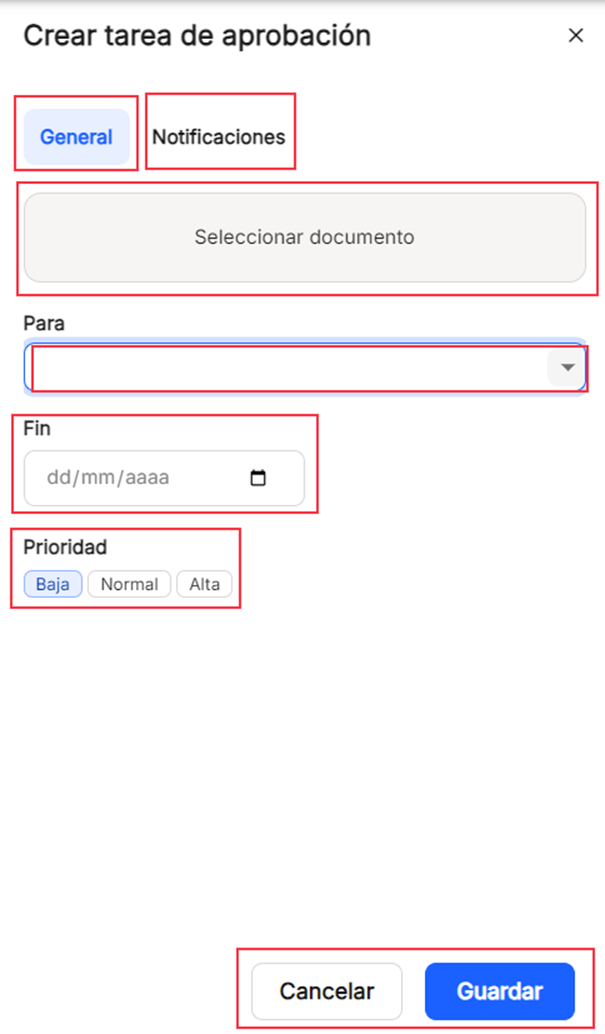
"To". You can select from the search a user or group from the existing ones, use the search, and just enter three characters, and it will locate the relevant matches. By default, it will always display the first three values of the list of both users and groups, but searches will be performed on all the lists already established.
By clicking on "+ Create task", it will also be possible to enable or disable notifications for that task. The options are "Create notification" (notifies the task recipient that a task has been assigned), "Task start notification" (alerts the task recipient of the day the task will start) and "Task completed notification" (issues an alert to the task creator once the task has been completed).
"Create document upload task"

The "Create document upload task" will allow you to directly create a new document upload task by filling in the "Subject" box with free text. You can also use the drop-down list in the "To" box to select a user or group from the existing ones. It is obligatory to select a "Collection" from the drop-down list that is displayed, being able to scroll to see all of them. You can also select an "End date" for the task, and you can also select a"Priority" type, with the different options offered.
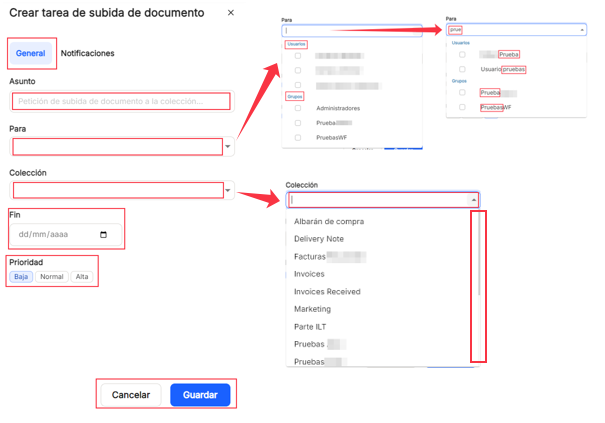
"To". You can select from the search engine a user or group from the existing ones, use the search, and just enter three characters, and it will locate the relevant matches. By default, it will always display the first three values of the list of both users and groups, but searches will be performed on all the lists already established.
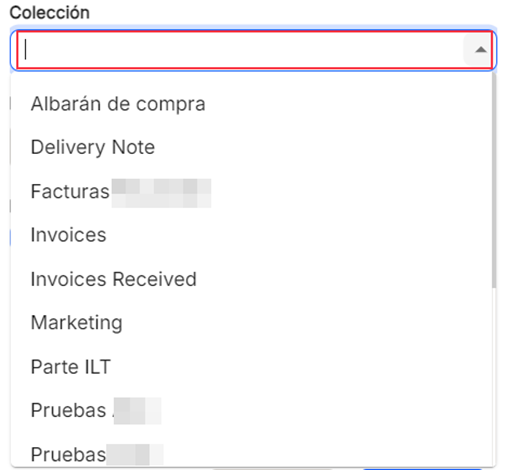
"Collection". You can select from the drop-down list one of the collections already created in the system.
By clicking on "Create task", you will also be able to enable or disable notifications for that task. The options are "Create notification" (notifies the task recipient that a task has been assigned), "Task start notification" (sends an alert to the task recipient of the day the task will start) and "Task completed notification" (issues an alert to the task creator once the task has been completed).
"New document"
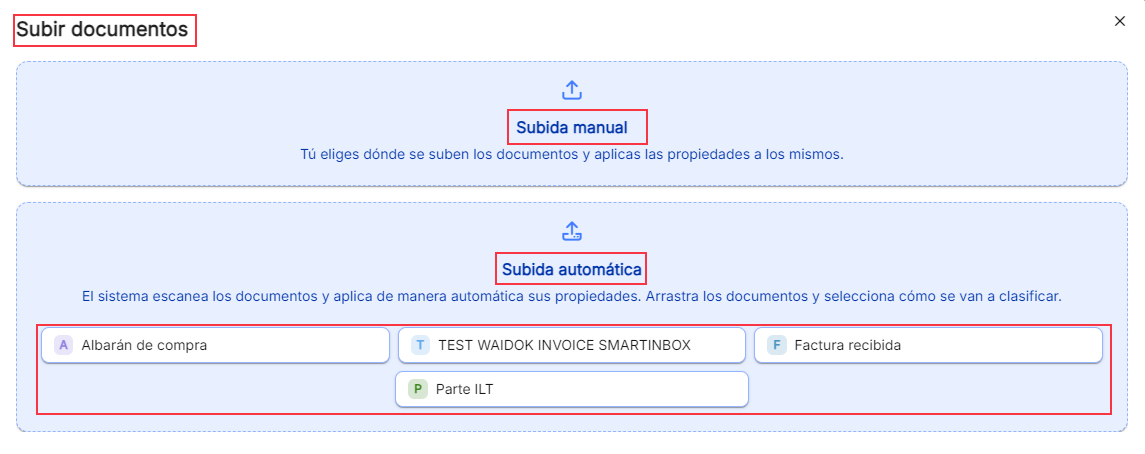
The"New document" option will allow you to upload a new document, through the "Upload documents" menu, either with the "Manual upload" or "Automatic upload" option, already explained in the "Dashboard" and "Document explorer" menus.
"Create document from template"
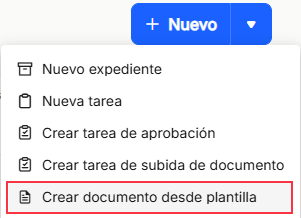
"Create document from template" allows the creation of a new document from pre-existing templates. Once you click on the link, the tool opens in the same browser a screen where three options are displayed, allowing you to display options depending on what you select.
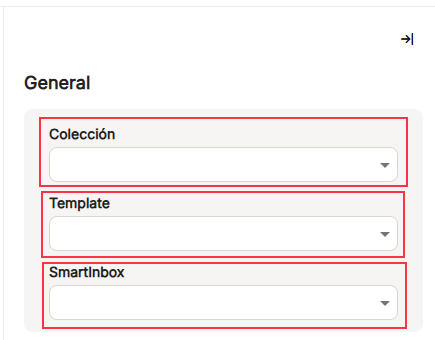
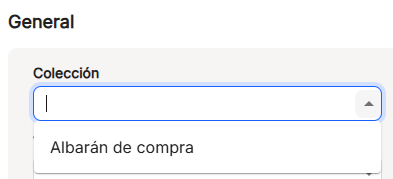
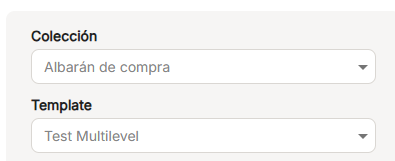
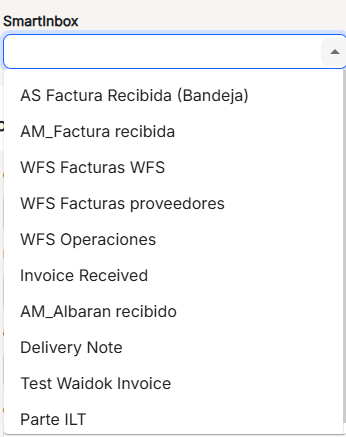
The templates are associated to each"Collection". Once you click on the collection drop-down, the templates associated to that collection are displayed, so that you can select one of them. Depending on the template chosen, the drop-down will show the inboxes in which the document will be registered.
After selecting the three previous boxes, a drop-down list of"Properties" associated with that template will be displayed for its completion, with its different characteristics, previously defined.
Then, once completed, as throughout the application, you must use"Clear" to delete all the data previously reviewed or"Save" to create and store the document created on the basis of a template.

No comments to display
No comments to display