Workflow generation
![]() WORKFLOWS
WORKFLOWS
From this section of the menu, users can view a table listing all the workflows that have been generated. The user will be able to define workflows on the documents uploaded to the application. The document management system flow or document workflow consists of a process automation where the pre-established hierarchy intervenes, but applied to the existing documents. This means that activities are carried out with the least possible effort on the part of the personnel, i.e., through software. Thanks to workflow automation, the company will be able to significantly reduce the time invested in each process.
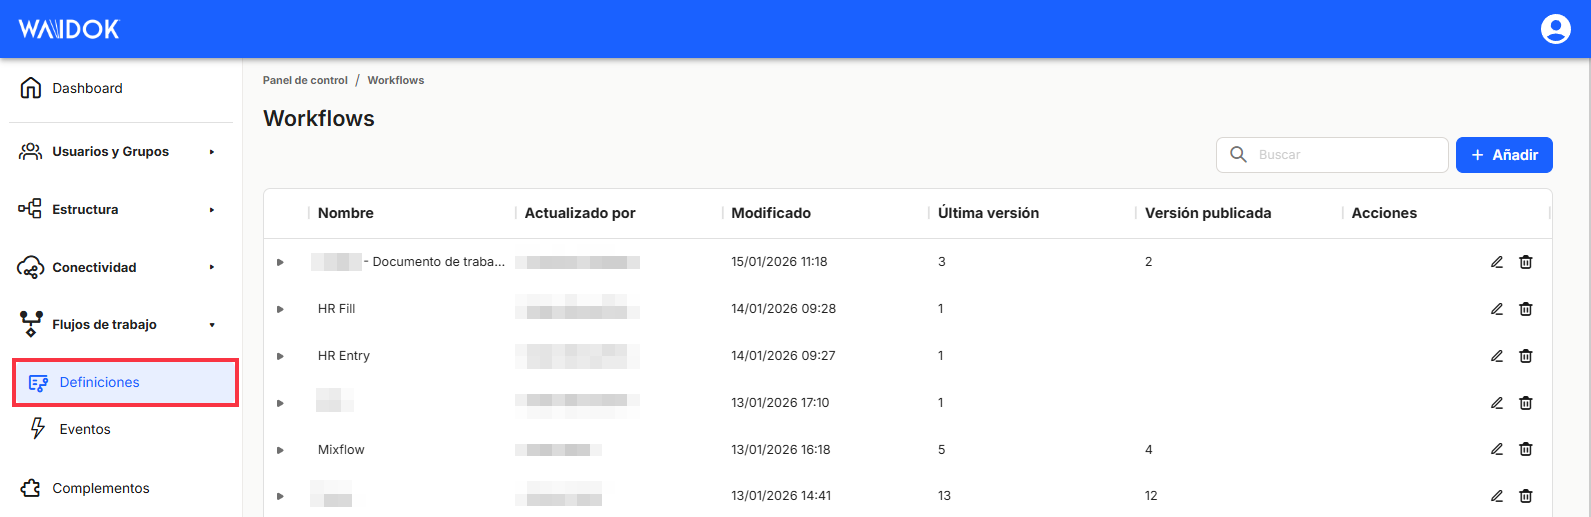
Through"Add", the application displays a new window to register a new workflow, where it is necessary to establish a Name and a Description identifying the flows that have been established, and then Save or Cancel.

Once we have created or generated the corresponding workflow, we can either Edit the flow by clicking on the pencil icon![]() or Delete the flow by pressing the garbage can
or Delete the flow by pressing the garbage can ![]() If you do not need to keep it, launching a popup window to confirm the elimination elimination.
If you do not need to keep it, launching a popup window to confirm the elimination elimination.


In the lower right part of the table, the total number of workflows obtained as a result is shown, either without applying any type of search or filtering or applying any of the possible options. The system shows by default 10 lines per table and screen, allowing to show 15 lines or 25 lines per table and screen. It also allows forward or backward navigation in the displayed lists, depending on the pagination set.

In case you have chosen the Edit option, the system will display in the same browser window in which you are working, a main board with grids for the workflow design or task flow called"Workflow Editor". This editor offers flexibility in workflow configuration and execution. Whether you are looking for a fast console-based workflow or a full ASP.NET Core workflow server.
Designer workflows
For visual representation and management of your workflows, the workflws editor offers an easy-to-use interface to design, monitor and manage your workflows. When using the editor, you define workflows by dragging and dropping activities onto the canvas and connecting them. The underlying data model is the same as the one used for programmatic workflows and uses the Flowchart activity. In other words, when you create workflows using the editor, you are creating workflows whose Root (ownership) is established in a Flowchart (activity).
When you create workflows with the designer, input values are defined using JavaScriptscript expressions instead of C# lambda statements. Althoughyou canuse C# script expressions in the designer, the difference is that C# script expressions are evaluated at runtime, while lambda expressions in programmatic workflows are compiled at compile time.

Workflows editing window working areas
- Activities of available workflows:
- Administration.
- Find group: allows you to find a group of users based on the group name.
- Find user: allows you to find a user based on email or user name.
- Receive general event: starts a workflow when a new event is received.
- Search master table: retrieves one or more rows from a selected master table.
- Branching.
- Decision: enter a condition that has "True" or "False" outputs.
- Join: activity of joining several flow lines. Allows waiting for any or all of the preceding activities.
- Switch (flow): allows inserting as many outputs as necessary by configuring the conditions to be fulfilled in each one of them.
- Document explorer (Document explorer):
- Apply document stamp: application of a dynamic stamp on a document.
- Associate documents: creates an association between two documents.
- Create smartinbox document: creation of a document based on a template.
- Digital signature flow: creation of a remote signature flow.
- Get document by ID: retrieves a document and its metadata based on the document ID.
- Get document metadata table by ID: retrieves the metadata of a table-type property from a document.
- Receive document: activity of entering a document in Waidok.
- Receive document deleted: starts a workflow when a document is deleted.
- Receive document event: starts a workflow event when a new document is received.
- Receive document updated: starts a workflow when a document is updated.
- Search document: retrieves one or more documents based on text or metadata associated with the documents in the selected collection.
- Search documents AI: send documents to the AI engine for processing.
- Update document metadata: allows you to update the metadata of a document based on the document ID or the metadata associated with the document in the selected collection.
- Flow:
- End: Indicates the end of the workflow.
- Forms:
- Receive form request response: activity that begins when the response to a form request is completed or rejected.
- Send custom form: sends a preconfigured form to a user or a group.
- HTTP:
- HTTP request (flow): activity that determines an action in the workflow when a given response is received from an HTTP URL (200, failed to connect, Timeout, etc.).
- HTTP request (flow): activity that determines an action in the workflow when a given response is received from an HTTP URL (200, failed to connect, Timeout, etc.).
- Notification:
- Notify by email: sends an email to a user or a group of users.
- Primitives:
- Set variable: assigns values to a predefined variable.
- Records:
- Create record: creates a record of a certain type with some metadata values.
- Get record by ID: retrieves a record and its metadata based on the record ID.
- Receive record: activity of entering a file into Waidok.
- Record deleted: starts a workflow when a record is deleted.
- Receive record event: starts a workflow event when a new record is received.
- Record updated: starts a workflow when a record is updated.
- Search records: retrieves one or more records based on text or metadata associated with a record type.
- Update record metadata: allows you to update the metadata of a record based on the record ID or the metadata associated with the record of the selected type.
- Scheduling:
- Delay: delay in the execution of an activity based on a time interval.
- Tasks:
- Create approval task: generation of an approval task for a user or group of users that allows exits to approval, rejection and other.
- Create decision task: generation of preconfigured decision tasks with the intervention of a user or group of users that allows exits to rejection and other.
- Create task: generation of a simple task to be performed manually by a user or group of users.
- Create upload document task: generation of a document metadata update task for a user or group of users that allows outputs to update, reject and other.
- Receive task: activity of entering a task in Waidok.
- Receive task deleted: starts a workflow when a task is deleted.
- Receive task updated: starts a workflow when a task is updated.
- Administration.
- Workflow name and save area. By default the saving is automatic, but it is necessary to publish it in order to make it operational in production.
 .
. - Workflow design area. Activities are dragged and merged in this work area.
- Input and output data and information of the workflow activities. It is also possible to change the name under which we see the activities in the workflow design area.
- Workflow configuration areaHere you can edit the workflow properties, as well as the variables, the workflow input and output, and view the history.
- Properties: this is a set of specific workflow data such as the name, a description, and metadata, among other things.
- Variables: where the variables that can be used within the workflow and throughout the environment are configured.
- Input/Output: to configure workflow inputs and outputs.
- Version history: where saved versions of the workflow are added and the version that is currently published and in use is indicated. Previous versions of the flow can also be retrieved.
Example of a workflow designed in Waidok
In this example/model, the design grid of the selected workflow, whose name is shown in the upper part, in this case "Sales quote", is differentiated in the central part . Below the name of the workflow, there is a toolbar that will act on the workflow tasks already defined. On the left side are shown the library of activities that are contemplated in different categories, each of them containing more options that will be able to be selected once each of them is displayed. On the right side there is a series of values and information corresponding to each of the workflows and their variables.
Let's see an example using a JavaScript expression.
The following workflow has been created using the designer:

Description of the activities in the example workflow
- We start the flow with the entry in the system of a document from the Sales quote collection.
- It is checked if the total budget is greater than or equal to €2,500.
- If the amount is equal to or greater than €2,500, it is sent for approval to a user.
- If approved, a task is generated for the Sales team to send to the customer.
- If rejected, a correction task is generated for the Sales team.
- If the amount is less than €2,500, a task is generated for the Sales team to send to the customer.
- If the amount is equal to or greater than €2,500, it is sent for approval to a user.
No comments to display
No comments to display